Below is a detailed guide on the fastest and most effective way to install composite wood-plastic doors currently available:

Step 1. Inspect and remeasure the door opening – Installation of composite wood-plastic doors
Check that the dimensions of the top, middle, and bottom of the width, the left and right of the height, and the wall thickness are uniform. A level or spirit level can be used to check the vertical alignment of the door opening. A properly sized door opening is crucial for the successful installation of the wood-plastic composite door. If the opening is defective, tilted, warped, the wall is uneven, or the dimensions are outside the tolerance range, the installation team must immediately report this to the responsible person for appropriate action.
Advantages of wood-plastic composite doors Naviwood It is possible to accept a large tolerance for the door opening thanks to the smart, adjustable trim. The tolerance for the door opening when installing wood-plastic composite doors is approximately +20mm for the width and +20mm for the height.
Step 2: Secure the padding (or insect-shaped bracket) to both sides of the opening:
The night screen, also known as the beetle, is made of wood-plastic composite High-quality, water-resistant, durable, and with good screw-holding capacity. The gasket acts as an intermediary connecting the door frame to the wall, directly affecting the stability of the door after installation.
Depending on the strength and structure of the wall, the installers will use different types of screws.

- The wall has a stable structure; concrete nails are used to directly fasten the mattress pad to the wall.
- For walls with weak structures, technicians will use D8x100 expansion screws.
- Drywall walls are reinforced with a steel frame using self-drilling screws.
- The walls are made of a wooden frame secured with screws.
Step 3: Attach the frame to the wall.
Install the two vertical frame bars first, then the horizontal frame. The vertical and horizontal frame bars must be precisely measured and cut to the actual installation dimensions. For bathroom doors, the installers must pay attention to cutting the bottom of the frame to match the stone steps if present. This small detail ensures both aesthetics and airtightness, preventing gaps where insects can nest. Then, connect the frame to the pre-attached mounting plate on the wall using screws.

Connect the vertical and horizontal frame sections as shown below.

METHOD FOR INSTALLING SCREWS THROUGH THE FRAME:
* Use a mounting bracket behind the door frame, press the frame against the wall, then drill through the frame and the bracket. Insert the expansion anchor and fasten the frame securely (similar to installing a regular aluminum door).
* Use a 10mm recessed cap to neatly cover the screw hole.
Step 4: Install the hinges onto the door and attach the door to the frame.
For a standard single-leaf door, install three hinges on the leaf. The positions of the three hinges are 200mm and 800mm from the top of the leaf, and 250mm from the bottom of the leaf, respectively. Position and mount the leaf into the frame, ensuring a 3mm gap between the frame and the leaf, and a 5mm gap between the leaf and the floor.

Step 5: Install the trim onto the door frame.
Calculate the length of the trim strips and cut them at a 45-degree angle. Connect the trim strips to the frame using the clips. Use silicone sealant to seal any gaps between the trim strips and the wall. Similarly to door frames, for bathroom doors, installers must pay close attention to fitting the trim strips flush against the stone floor.

Step 6: Install the door lock and other wooden door accessories.
To ensure absolute precision, the lock holes on the door were pre-drilled at the factory. Technicians then proceeded to install the lock cylinder, lock mechanism, and side panel. lock and the lock handle on the door. Next, cut and install the lock jaw into the frame. Test the lock by opening and closing the door to check the fit between the lock bolt and the lock jaw.

A guide to drilling a door lock hole for a perfect, quick, and accurate result:
Step 7: Final cleaning.
Perform a final inspection of the door before cleaning it and handing it over to the customer. Use a damp cloth with clean water to wipe away any dust around the door frame and the door leaf. wood-plastic doors The product is delivered to the customer in its original protective plastic packaging.
Genuine wood-plastic composite doors.

Genuine composite wood-plastic doors always have a protective label with the manufacturer's logo printed on it.
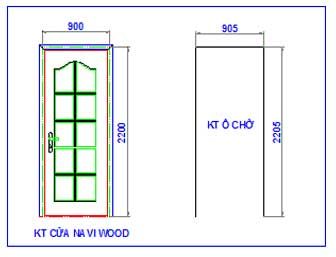
TECHNICAL SPECIFICATIONS OF COMMONLY USED WOOD-PLASTIC COMPOSITE DOORS

The door frame is designed to match the wall thickness.
Standard dimensions of composite wood-plastic doors according to feng shui.

Install doors according to feng shui principles.


